Sentry is a control software for the iSCAT microscope constructed in my current research group. The software is designed to control all the different equipments of the microscope: the cameras, the piezo-electric stage, the LASER light source, the shutter and a spatial light modulator. While the software is specific to our microscope, it is modulable enough to be adapted to any kind of setup.
Description
Sentry, named after the Boeing E-3, is a software overseeing and controlling our iSCAT microscope and all its equipments. The design of the user interface has been optimised to gather all the controls on the main interface.
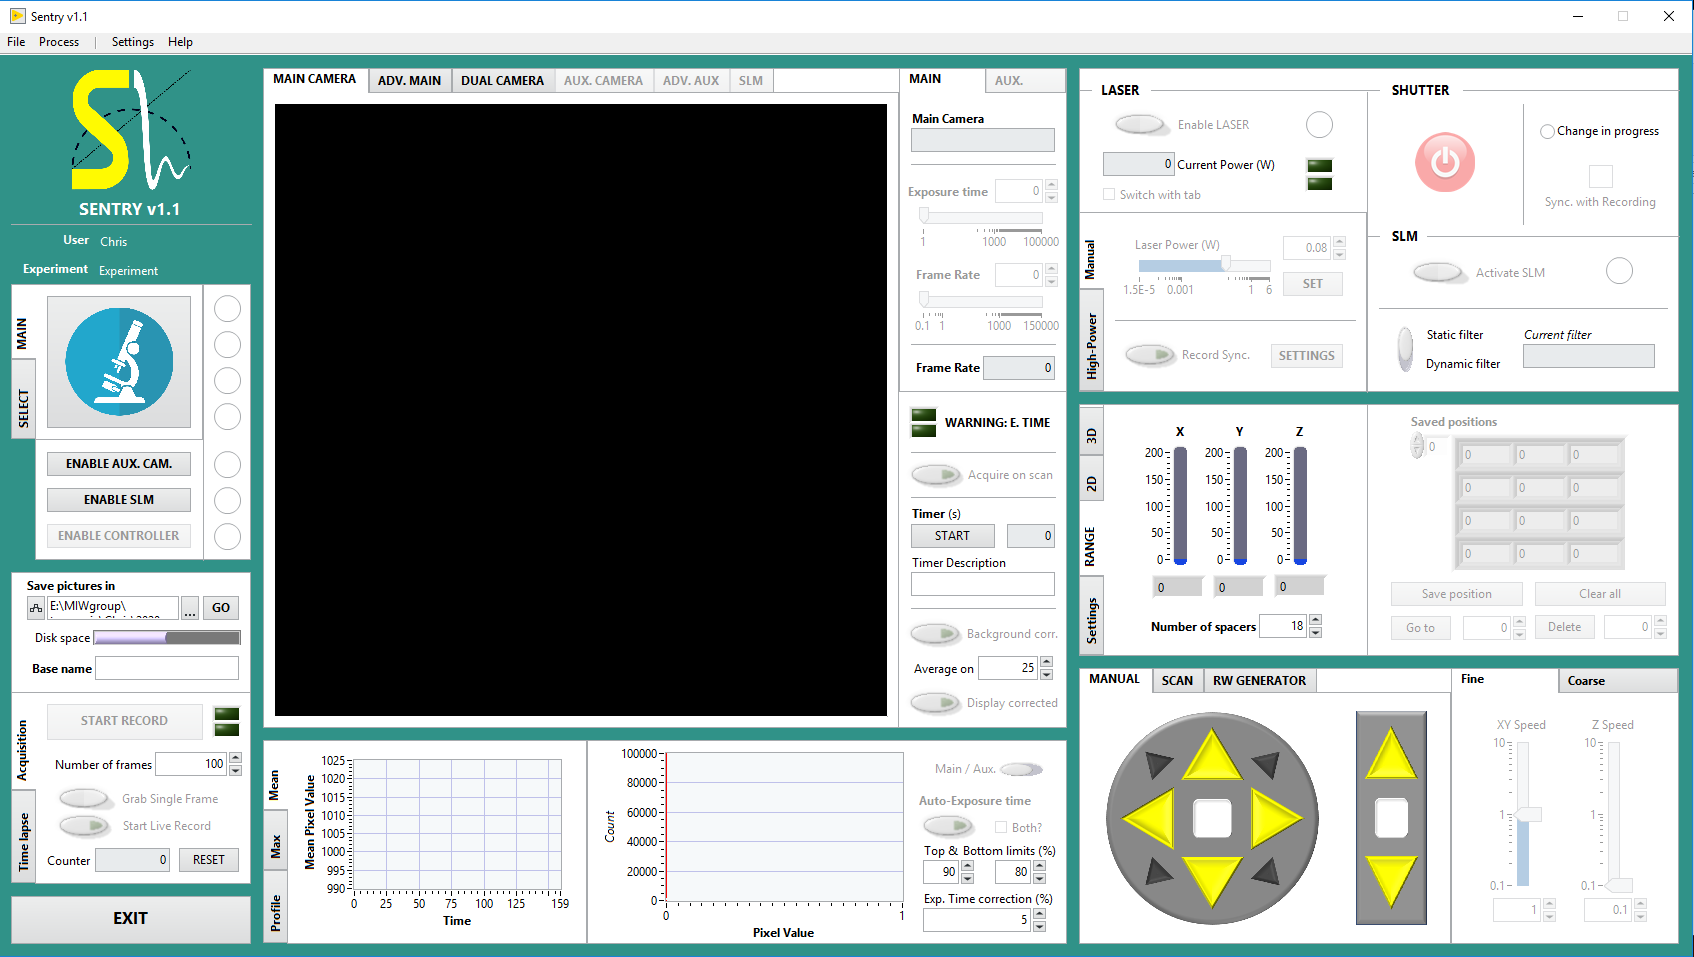
The advanced settings of the different elements can be accessed in separate menus, in order to keep the interface as clean and simple as possible.
Equipment support
You can find described below the list of the different equipments currently supported by Sentry, as well as a quick guide on how to integrate similar equipments in the software.
Cameras
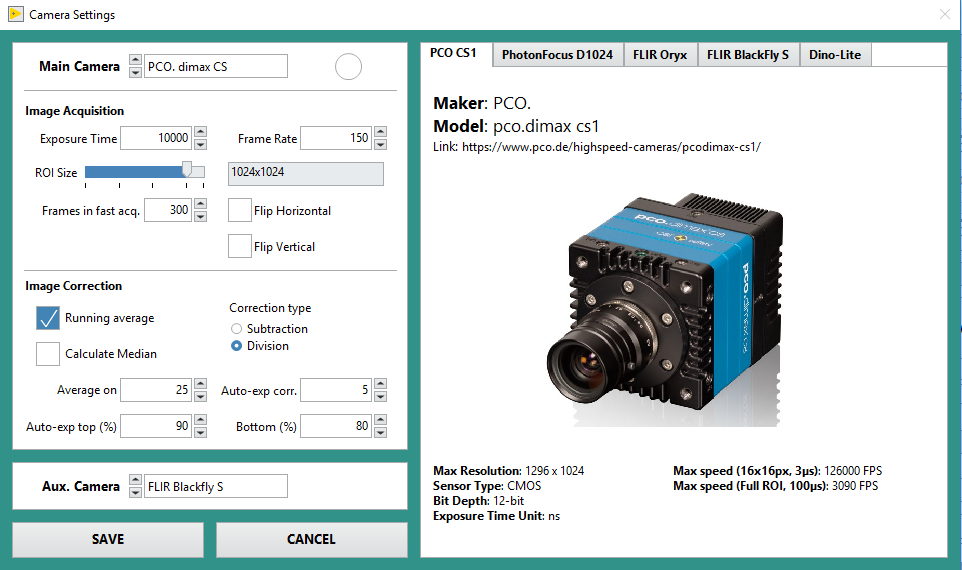
The current cameras are already supported in Sentry:
- PCO. dimax cs1 and cs4
- PhotonFocus D1024
- FLIR Oryx
- FLIR BlackFly S
Please note that the PhotonFocus D1024 is experiencing several bugs that we could not solve (e.g. flickering).
To integrate a new camera, the following subVIs should be created:
- Camera detection and initialisation.
- Apply settings to the camera: (i) region-of-interest, (ii) exposure time and (iii) frame rate.
- Grab a single image.
- Do an high-speed recording to save an image array.
- Close the camera safely.
Piezoelectric stage
The current piezoelectric stage supported by Sentry is the Physik Instrumente P-545-3R8S. To integrate another piezoelectric stage, the following subVIs should be created:
- Stage detection and initialisation.
- Read the current position of the stage.
- Set a new position to the stage.
- Close the stage safely.
LASER source
The current LASER light source stage supported by Sentry is the Kvant Lasers RLM-6000M. The Kvant Lasers is currently controlled by applying a voltage on the external input of the laser module. This is done via a DAQ card.
To integrate another LASER or other type of light source, the following subVIs should be created:
- Laser detection and initialisation.
- Read the current laser power.
- Set a new laser power.
- Close the laser safely.
Shutter
The current microscope shutter supported by Sentry is the Thorlabs SC10.
To integrate another shutter, the following subVIs should be created:
- Shutter detection and initialisation.
- Read the current shutter status.
- Set the shutter status.
- Close the shutter safely.
Spatial Light Modulator
The current spatial light modulator (SLM) supported by Sentry is the Meadowlark Optics 1920x1152. Integrating another spatial light modulator might not be as straightforward as the other types of equipment. Please refer to the capacity of your SLM and the application desired to see which subVIs you might need.
Details on the code
Sentry is based on the queueing system of LabVIEW and parallel loops. Briefly, only the User Interface (UI) is accessible to the user. The user can visualise what is happening in Sentry via the display, and can interact with the interface using buttons and all.
The UI does not do anything when a button or so is pressed. The event is captured and the corresponding action is written into an instruction. This instruction is then sent by the UI to the specific equipment. Once the equipment has read the instruction, it does the related action and eventually sends data back to the UI for display. In this configuration, each equipment are enclosed in a separate and independant loop. By doing this, the action of one piece of equipment shall not interfere with other equipment or slow down the software.
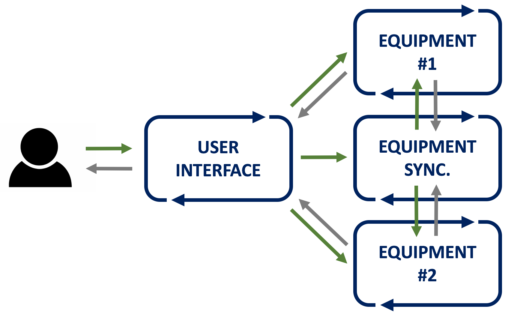
However, it can happen that two components are or should be connected together. For example, one could want to scan the sample and take a picture at each step. In this case, another type of loop is created, called synchronisation loops. Synchronisation loops receive the orders from the UI, but do not interact with the equipment directly. Instead, these loops send new orders to the equipment loops and wait for the results to proceed.
Download
The whole software is free to download. Use the link below to start the download (10MB).
Please remember that full support is not provided for this software. You are still free to contact me if you have specific questions on the code, but I cannot guarantee that I will be able to help you.